
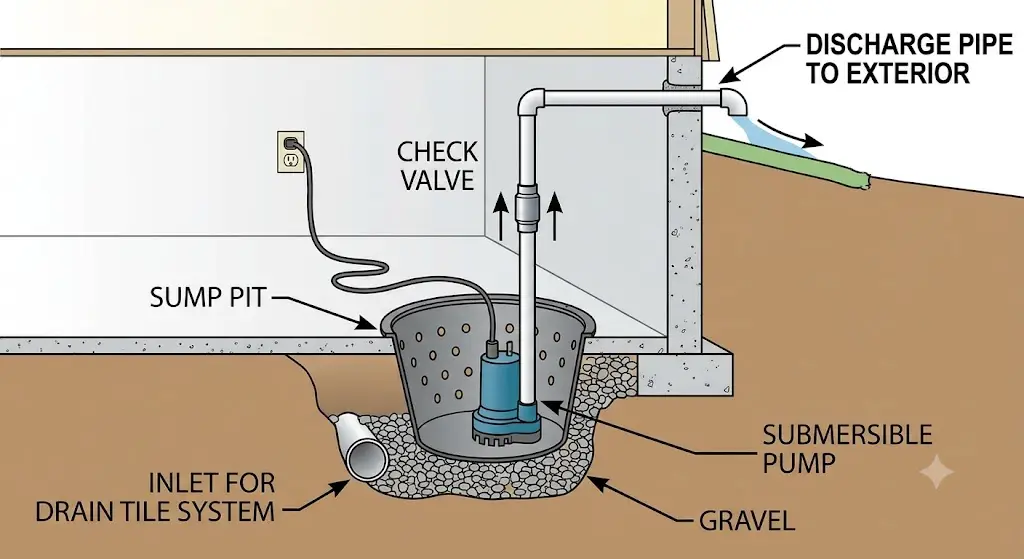
Quick Answer: To install a sump pump, cut and dig a pit, set the basin on a gravel base, level the pump inside, and run a sloped PVC discharge line outside. Add a check valve above the pump, plug into a properly protected outlet, install a battery backup, and test with water before closing the lid. In Calgary, confirm permit and discharge rules first.
A sump pump gives groundwater somewhere to go before it reaches your basement floor. Learning how to install a sump pump yourself is realistic for a handy homeowner, but the job involves cutting a concrete slab, gluing plumbing, and working with electricity near water. In Calgary it also involves permits and discharge rules that most generic guides ignore.
This guide covers all ten sump pump installation steps, plus the details that cause most failures: air-lock relief holes, freeze protection, where discharge water is allowed to go, and what to check in the slab before you cut. If you already have a pit and just need a new pump, see our step-by-step sump pump replacement guide instead.
At a Glance
| Time | About 6 to 10 hours of work for a first-timer, plus roughly 24 hours of concrete cure time |
| Difficulty | Moderate to advanced: concrete cutting, plumbing, and electrical work |
| Permits | A plumbing permit is generally required in Calgary; new electrical work may need its own |
| Hiring a pro | A complete new installation in Calgary typically runs $1,500 to $3,000. See our sump pump installation cost guide |
Table of Contents
- Before You Start: Do You Need a Permit in Calgary?
- Safety Checks Before You Cut
- What You Need
- Choosing the Right Sump Pump
- Step 1: Pick the Best Location
- Step 2: Install a Sump Pump Pit
- Step 3: How to Install a Sump Pump in a Concrete Floor
- Step 4: Position and Level the Pump
- Step 5: Sump Pump Discharge Pipe Installation
- Step 6: Attach the Check Valve
- Step 7: Sump Pump Wiring and Electrical Setup
- Step 8: How to Install a Backup Sump Pump
- Step 9: Test the System
- Step 10: Seal, Cover, and Finish Up
- Calgary Winter and Spring Tips
- How to Install a Sump Pump Without a Floor Drain
- Common Mistakes That Lead to Sump Pump Failure
- Quick Troubleshooting After Installation
- DIY vs. Hiring a Professional
- Maintenance Tips to Extend Pump Life
- Frequently Asked Questions
Before You Start: Do You Need a Permit to Install a Sump Pump in Calgary?
Check these three things before you pick up a hammer drill.
- Permit. In Calgary, installing a sump pump generally requires a plumbing permit and an inspection, and adding a new outlet or circuit may require an electrical permit. Confirm the requirements with the City of Calgary (call 3-1-1 or check calgary.ca) before you cut the slab. Permit rules generally apply whether you hire the work out or do it yourself, and skipping a required permit can complicate a home sale or an insurance claim.
- Discharge. The City’s Guide to Lot Drainage says sump pump discharge must be directed away from neighbouring properties and structures, should avoid hard surfaces such as sidewalks, and must be protected from freezing. It sets a minimum of 2 metres (about 6.5 feet) from the foundation. Never connect the discharge to a floor drain or the sanitary sewer.
- Flood areas. Homes in the flood fringe or other designated flood areas face additional rules, so check the City’s flood information before you plan the discharge route.
Rules change, and the guide above is an older City document, so treat 3-1-1 as the final word.
Safety Checks Before You Cut
Most DIY sump pump problems start with something nobody checked first.
- Scan the slab. Some homes, especially newer or renovated ones, have in-floor heating tubes, water lines, conduit, or rebar under the concrete. Use a slab scanner or your home’s drawings before you drill.
- Protect your lungs. Cutting and breaking concrete creates fine crystalline silica dust. Wear a respirator rated for fine dust, and use a vacuum or dust shroud with your rotary hammer.
- Call before you dig outside. Contact Alberta One-Call before trenching for the discharge line so buried gas, power, and water lines are marked.
- Cut the power. Turn off the breaker for any circuit near the work area.
What You Need
Tools:
- Rotary hammer drill with masonry bits
- Sledgehammer and cold chisel
- Shovel and digging bar
- Hacksaw or PVC pipe cutter
- Level, tape measure, and drill with a 3/16-inch bit
- Safety glasses, hearing protection, work gloves, and a dust respirator
- Wet/dry shop vacuum
- Slab scanner (rent or borrow)
Materials:
- Submersible sump pump
- Battery backup sump pump (strongly recommended)
- Sump basin with a tight lid (18 to 24 inches wide, 24 to 36 inches deep)
- 1.5- or 2-inch PVC pipe, elbows, and couplers, plus PVC primer and cement
- One check valve for each pump, and a union fitting
- Clean pea gravel
- Quick-setting concrete mix
- Spray foam sealant
- High-water alarm
- A grounded outlet (installed by a licensed electrician if you don’t have one nearby)
Choosing the Right Sump Pump
A submersible pump with a battery backup is the best fit for most homes, so that is the setup this guide uses. Size depends on how much water you move and how high the pump must lift it.
| Pump size | Typically suits |
| 1/3 HP | Small basements with light, occasional seepage |
| 1/2 HP | Most homes with moderate water intrusion |
| 3/4 HP or larger | High water tables, frequent flooding, or long or high discharge runs |
For the full breakdown, see our guide to choosing the right sump pump size for your Calgary home. To compare pump types, read battery backup vs. pedestal vs. submersible sump pumps.
Step 1: Pick the Best Location
Location decides how well the whole system works.
- Walk the basement and find the lowest point, or where water pools first.
- Choose a spot near an exterior wall on the side of the house where the ground slopes away. That keeps the discharge run short.
- Confirm a grounded outlet is within reach.
- If your home has weeping tile (also called a foundation drain), locate where it enters the basement so you can tie it into the pit.
- Avoid load-bearing walls and plumbing you can’t reroute, then mark the spot.
Step 2: Install a Sump Pump Pit
- Trace a circle about 6 inches wider than the basin.
- On a dirt or gravel floor, dig to the basin’s depth plus 4 to 6 inches for a gravel base. On concrete, follow Step 3 first.
- Add a 4 to 6 inch layer of clean gravel at the bottom.
- Set the basin so the rim sits flush with, or just above, the floor.
- Backfill around the basin with clean gravel, not soil, so water can move freely toward the pit.
If water seeps in as you dig, bail it with the wet/dry vacuum and keep going. A level, stable basin keeps the float switch working.
Step 3: How to Install a Sump Pump in a Concrete Floor
If you have a poured slab, you need to break through it first. Complete the safety checks above before you start.
- Outline a circle about 6 inches wider than the basin.
- Drill a continuous ring of holes along the outline with the rotary hammer.
- Break the concrete inside the ring with a sledgehammer and chisel.
- Remove the debris and dig out the soil beneath to the right depth.
- Set the basin, backfill with gravel, then trowel quick-setting concrete around the rim so it blends with the floor.
Let the concrete cure for about 24 hours, or as long as the product requires, before moving on.
Step 4: Position and Level the Pump
- Set the pump on a few inches of gravel or a paver so it sits off the sediment at the bottom.
- Check with a level that the pump sits straight.
- Make sure the float switch swings freely without touching the basin wall or discharge pipe.
An angled pump or a snagged float is behind a surprising number of failures.
Step 5: Sump Pump Discharge Pipe Installation
The discharge line carries water away from your home, and it is where most Calgary-specific problems appear.
- Plan the exit above ground level, through the rim joist or upper foundation wall, with as few elbows as possible.
- Run 1.5- or 2-inch PVC from the pump outlet, through the lid, and out the wall. Glue every joint with primer and cement.
- Outside, slope the pipe downward and away from the house so it drains empty after each cycle.
- End the pipe at least 2 metres (about 6.5 feet) from the foundation. Aim it away from neighbours, sidewalks, and the street.
- Add freeze protection (see Calgary tips below), such as a larger perforated relief pipe or a pop-up emitter, so water can still escape if the outlet ices over.
- Never tie the discharge into a floor drain or the sanitary sewer.
Step 6: Attach the Check Valve
A check valve stops water from flowing back into the pit each time the pump shuts off. Plumbing code expects the check valve to sit above the pump outlet.
- Install the valve in the vertical pipe just above the pump, with the arrow pointing in the direction of flow.
- Add a union fitting just above the valve so you can remove the pump later without cutting pipe.
- Drill a 3/16-inch relief hole in the discharge pipe below the check valve and above the pump. This prevents air lock, which can leave a pump humming without moving water. Expect a small spray back into the pit when it runs.
- Confirm the valve opens under flow and closes when the pump stops.
Without a working check valve, the pump short-cycles and wears out early.
Step 7: Sump Pump Wiring and Electrical Setup
Electrical safety is non-negotiable because the pump sits in standing water.
- Plug the pump into a grounded outlet, ideally on its own circuit. Where code requires GFCI protection, use it.
- GFCI outlets can trip without warning, and a tripped outlet means a silent, unpowered pump. Test the GFCI monthly and install a high-water alarm.
- Never use extension cords, power strips, or adapters for a sump pump.
- If you need a new outlet or circuit, hire a licensed electrician. New electrical work may require a permit.
- Give the backup pump its own outlet, separate from the primary pump.
Faulty wiring near water is a real shock and fire hazard, so this is the step to hand off if you are unsure.
Step 8: How to Install a Backup Sump Pump
Float switches stick, motors burn out, and breakers trip. A battery backup keeps the basement dry through a pump failure or a power outage.
- Choose a battery backup pump sized to match, or slightly exceed, the primary pump.
- Place it in the same basin and set its float a few inches higher, so it only runs if the main pump fails to keep up.
- Give it its own discharge line, or join the main line with a wye fitting. Each pump needs its own check valve, so water can’t flow backward through the idle pump.
- Mount the battery and charger on a shelf or wall bracket above potential flood level, never on the floor.
- Confirm the charger is keeping the battery topped up.
A backup is cheap insurance, especially during storms and cold snaps when outages and heavy runoff often overlap. See our basement flooding guide for how those risks stack up.
Step 9: Test the System
- Pour several gallons of water into the pit until the float lifts the pump.
- Confirm the pump starts, empties the pit, and shuts off cleanly. Repeat three to five times.
- Lift the backup float by hand to confirm it activates.
- Check the outdoor discharge to confirm water exits and flows away from the foundation.
- Trip the GFCI and test the alarm.
If anything hesitates, runs nonstop, or won’t shut off, see our sump pump troubleshooting guide before moving on.
Step 10: Seal, Cover, and Finish Up
- Foam any gaps around the pipe where it exits the wall.
- Snap on the lid, which should have cutouts for the pipes and cord.
- Use an airtight, gasketed lid and seal the penetrations. Health Canada recommends testing every home for radon, and a sealed lid helps keep soil gas out of the basement.
Calgary Winter and Spring Tips
- Don’t unplug the pump in winter. If the discharge freezes, a running pump can overheat. Cold-climate cities such as Winnipeg advise attaching a larger-diameter perforated pipe to the outlet so water can escape if the end ices up.
- Watch chinook cycles. Rapid melt and refreeze can block the outlet overnight. Check the discharge after thaws.
- Prepare for spring melt. Runoff peaks when the ground is still frozen, so test your sump pump before spring.
- Keep the outlet clear. Snow and ice around the end of the pipe can send water back toward the house.
How to Install a Sump Pump Without a Floor Drain
- The basin itself is your collection point, so you don’t need an existing floor drain.
- If your home has weeping tile, route it into the side of the basin before backfilling with gravel.
- Without weeping tile, the pit still collects groundwater that rises through the slab, and the gravel bed helps direct it inward.
Common Mistakes That Lead to Sump Pump Failure
- Discharging into the sanitary sewer or a floor drain. It overloads the sewer and is not permitted.
- Ending the pipe too close to the house. Water recirculates into the same weeping tile.
- No check valve, or no air-relief hole. Both cause short-cycling or a pump that hums without pumping.
- No freeze plan. An iced-over outlet can burn out a pump in a single cold night.
- One pump, no alarm. A single failure goes unnoticed until the basement floods.
- Skipping the slab scan and the permit. Both can turn a weekend project into an expensive repair.
- Undersized discharge pipe. Anything under 1.5 inches restricts flow.
- No maintenance. Sediment and worn float switches cause most unexpected failures.
Quick Troubleshooting After Installation
| Symptom | Likely cause | First fix |
| Pump runs constantly | Float stuck or touching the wall | Reposition the pump and float |
| Pump turns on and off rapidly | Missing or failing check valve, or a pit that is too small | Check valve orientation and installation |
| Motor hums but no water moves | Air lock | Add or clear the 3/16-inch relief hole |
| Pump won’t start | Tripped GFCI or stuck float | Reset the GFCI and free the float |
Still stuck? Our sump pump repair team can diagnose it, and our warning signs guide explains what to watch for.
DIY vs. Hiring a Professional
A confident DIYer can usually finish a DIY sump pump installation over a weekend. Call a licensed plumber if:
- You are unsure about cutting the slab or working near electrical circuits.
- Your home has in-floor heat, existing weeping tile, or waterproofing that needs to be integrated correctly.
- You want permits, inspection, and a warranty on labour and parts handled for you.
- The discharge route is complicated by neighbours, grading, or a flood area.
DIY saves the labour portion of the bill, but you still pay for the pump, basin, materials, tool rentals, and permits. Our sump pump installation cost guide breaks down both routes. If you want a pro, see our sump pump installation service, and ask about financing. Not sure whether you need a new pit at all? A sump pump inspection can tell you, and our sump pump replacement service covers existing pits.
Maintenance Tips to Extend Pump Life
- Test the pump every three to four months by pouring water into the pit.
- Clean the inlet screen and basin at least once a year.
- Inspect the check valve annually.
- Replace the backup battery every 3 to 5 years.
- Check the outdoor discharge each spring and fall, and after thaws.
- Listen for unusual noises, which often signal a worn motor or impeller.
Our sump pump maintenance guide has the full checklist, and our guide to why Calgary homes need a sump pump explains the risk behind it. For the upside, see the benefits of installing a sump pump.
Frequently Asked Questions
How long does it take to install a sump pump?
Most first-time DIYers need about 6 to 10 hours of work over a weekend, plus roughly 24 hours for the concrete to cure. Replacing a pump in an existing pit takes far less time.
Do I need a permit to install a sump pump in Calgary?
A plumbing permit is generally required for a new installation, and new electrical work may need its own permit. Rules apply to the work, not who does it, so confirm with the City of Calgary at 3-1-1 before you cut the slab.
How far from the foundation should sump pump water discharge?
At least 2 metres (about 6.5 feet), according to the City of Calgary’s lot drainage guide, aimed away from neighbours and hard surfaces such as sidewalks and driveways.
Can sump pump water go into a floor drain or the sewer?
No. Sump discharge should go to the surface or storm system, not a floor drain or the sanitary sewer, which can overload the sewer and increase basement flooding risk.
Should I unplug my sump pump in winter?
No. Keep it plugged in. Instead, protect the discharge from freezing with a larger perforated relief pipe or similar fitting, because a frozen outlet can overheat the motor.
How deep should a sump pit be?
Most residential basins are 18 to 24 inches wide and 24 to 36 inches deep, deep enough to hold the pump and keep the float switch working.
What size sump pump do I need?
A 1/2 HP pump suits most homes with moderate water. High water tables or frequent flooding often call for 3/4 HP or larger. Pump lift height and discharge distance also matter.
Is a battery backup sump pump worth installing?
Yes. Outages often coincide with storms, which is when the pump matters most. A backup also covers the main pump failing.
What’s the difference between installing and replacing a sump pump?
Installing means cutting a new pit where none exists. Replacing means swapping a pump into an existing pit, which is much faster. See our replacement guide.
Need Help With Your Sump Pump?
If cutting concrete, permits, or electrical work isn’t how you want to spend your weekend, ProStar Plumbing & Heating has served Calgary homeowners since 1996. We install, repair, and replace sump pumps across Calgary, Airdrie, Chestermere, Cochrane, Okotoks, Springbank, Bearspaw, Crowfoot, Balzac, De Winton, Conrich, Delacour, and West Hills. See all the communities we serve.
Contact us or call (403) 250-7232 for a quote.